- High Quality & Great Pricing
- simply email us at moto@boondocksdecals.com
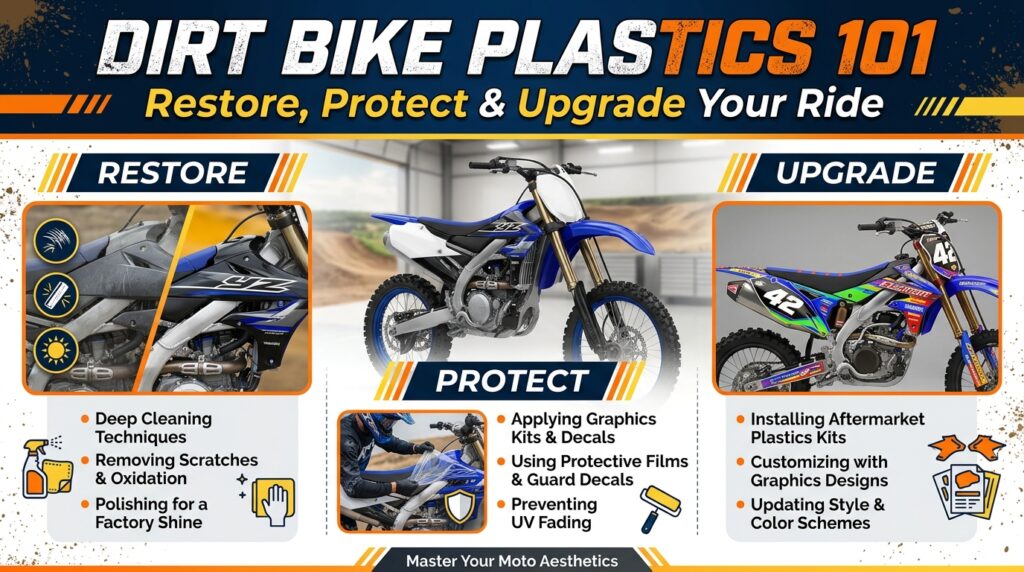
Dirt bike plastics take a serious beating. Mud, rocks, roost, branches, falls, sunlight, and repeated cleaning can quickly leave body panels scratched, faded, or cracked. Fortunately, replacing or upgrading plastics is one of the easiest ways to give a motorcycle a fresh appearance.
This Dirt Bike Plastics 101: Restore, Protect & Upgrade Your Ride guide covers the basics of choosing, restoring, protecting, and customizing motorcycle plastics. If you’re planning a complete visual transformation, visit Boondocks Decals for custom dirt bike graphics and vinyl decal kits designed to complement your bike.
Dirt Bike Plastics 101: Restore, Protect & Upgrade Your Ride starts with understanding what dirt bike plastics actually do.
Dirt bike plastics are the molded body panels mounted around the motorcycle. Depending on the bike, they can include front and rear fenders, radiator shrouds, side panels, airbox covers, number plates, and other protective or cosmetic pieces.
Besides giving the motorcycle its recognizable appearance, plastics help protect certain components from mud, debris, and impacts. Because they are exposed to harsh riding conditions, cosmetic damage is completely normal over time.
One of the most important lessons in Dirt Bike Plastics 101: Restore, Protect & Upgrade Your Ride is knowing when restoration is no longer practical.
Small scratches and faded surfaces may not require replacement. However, cracked panels, broken mounting points, severely warped plastics, or heavily damaged sections may be better replaced.
Inspect your plastics after major rides and crashes. Pay attention to areas around mounting holes and fasteners because damage in these locations can cause panels to loosen during riding.
Replacing damaged plastics can also provide a better surface for a new graphics kit.
Not every scratched panel needs to be thrown away. Dirt Bike Plastics 101: Restore, Protect & Upgrade Your Ride also includes practical restoration techniques.
Start by thoroughly cleaning the plastics. Remove mud, grease, chain lubricant, and other contaminants. Once clean, inspect the surface under good lighting.
Light scratches may be acceptable if you plan to cover the panel with new graphics. Deeper damage may require replacement rather than cosmetic restoration.
Avoid aggressive sanding or chemical treatments unless you’re certain they are appropriate for the specific plastic material.
When replacement is necessary, fitment should be your first priority.
KTM, Yamaha, Honda CRF, Kawasaki KX, and Suzuki RMZ motorcycles can have different plastic shapes depending on the exact model and model year.
When following Dirt Bike Plastics 101: Restore, Protect & Upgrade Your Ride, always confirm:
A panel that looks similar isn’t necessarily compatible with your motorcycle.
Riders generally have two main options when replacing bodywork: original equipment manufacturer plastics or aftermarket alternatives.
OEM plastics are designed specifically for the motorcycle and can provide precise fitment. Aftermarket plastics can offer different colors, styling options, and potentially more affordable replacement solutions.
The right choice depends on your budget, availability, preferred appearance, and intended use.
For motocross racing, precise fitment is particularly important because loose or poorly aligned plastics can become a distraction during riding.
Preparation is one of the most important parts of Dirt Bike Plastics 101: Restore, Protect & Upgrade Your Ride.
Before installing dirt bike graphics, make sure the plastic is completely clean and free from contaminants.
Remove old graphics and adhesive residue carefully. Wash the panels and allow them to dry completely.
Avoid applying decals over wax, silicone, oily residue, or heavy dirt. These contaminants can interfere with adhesion and may cause graphics to lift prematurely.
If the plastic is damaged beyond reasonable repair, replace it before applying a new graphics kit.
Once the plastics are clean and ready, custom graphics can completely transform the motorcycle.
Custom dirt bike graphics allow you to choose colors, patterns, race numbers, names, logos, and other design elements. They can make an older bike look newer or give a new motorcycle a personalized appearance.
Start Your Graphics with Boondocks Decals to begin creating a custom design for your motorcycle.
Quality vinyl decal kits are designed to follow the contours of the motorcycle’s plastics and create a coordinated appearance across multiple panels.
A good graphics design should work with the motorcycle’s existing shape and color scheme.
Whether you’re customizing a KTM, Yamaha, Honda CRF, Kawasaki KX, or Suzuki RMZ, consider the factory colors as a starting point.
You can either complement the original colors or completely change the visual identity with a custom design.
For motocross racing, matching the graphics with your jersey, helmet, and other riding gear can create a professional race-team appearance.
After upgrading your plastics, proper maintenance becomes important.
Mud and dust should be rinsed away before they become difficult to remove. Use a mild motorcycle-safe cleaner and a soft cloth or sponge.
Avoid aggressive scrubbing, harsh chemicals, and concentrated pressure-washer spray directly on graphic edges.
Regular cleaning also gives you an opportunity to identify cracks, loose fasteners, lifted graphics, or other problems before they become more serious.
Storage is another often-overlooked part of Dirt Bike Plastics 101: Restore, Protect & Upgrade Your Ride.
Extended exposure to direct sunlight can contribute to fading and aging of plastics and graphics. When possible, store the motorcycle indoors or in a shaded, suitable area.
Keeping the bike covered can also reduce dust accumulation and protect the plastics between rides.
Dirt bike plastics provide the foundation, while graphics create the visual identity.
If the underlying panel is cracked, badly warped, or heavily damaged, a graphics kit cannot completely solve the problem. A smooth and properly fitted plastic surface provides a much better foundation for vinyl decal kits.
This is why Dirt Bike Plastics 101: Restore, Protect & Upgrade Your Ride should be approached as a complete process rather than simply applying new stickers.
Inspect first, replace when necessary, prepare carefully, and then customize.
There are several mistakes beginners should avoid.
Don’t order replacement plastics without checking the exact model and year. Don’t install graphics over dirty or damaged surfaces. Don’t assume every aftermarket panel has identical fitment.
Also avoid using harsh chemicals on your new graphics and don’t aggressively pressure-wash the edges.
Taking a little extra time during preparation can make your finished bike look significantly better.
Following Dirt Bike Plastics 101: Restore, Protect & Upgrade Your Ride can provide several advantages:
For many riders, combining replacement plastics with a fresh graphics package provides the biggest visual transformation.
The best results come from treating the motorcycle as one complete design.
Your plastics, number plates, seat cover, dirt bike graphics, wheels, and riding gear can all work together.
A KTM, Yamaha, Honda CRF, Kawasaki KX, or Suzuki RMZ can look completely different with a carefully planned color scheme and quality vinyl decal kits.
Instead of choosing individual elements randomly, create a consistent design around your race number, preferred colors, and riding style.
Dirt Bike Plastics 101: Restore, Protect & Upgrade Your Ride is ultimately about creating a strong foundation for both the motorcycle and its appearance. Inspect damaged plastics, replace panels when necessary, prepare surfaces properly, and protect the finished bike with regular maintenance.
Whether you’re restoring an older motorcycle, preparing for motocross racing, or simply upgrading your weekend ride, new plastics combined with custom dirt bike graphics can make a dramatic difference.
For custom graphics and vinyl decal kits, visit Boondocks Decals.
Ready to upgrade your bike’s look? Contact Boondocks Decals today and start creating a custom graphics package designed specifically for your motorcycle.